Operational efficiency and quality corporate image can only be built on sound base of lean, streamlined processes yielding constant quality for internal and external customers. Well-placed, purpose-built scanning is an integral part of any production line today.
The same topics and questions arise always during the first discussions about the quality, lean production, online control, and efficiency. Finally, choosing a scanner is an easy task, but a bit of consideration, basic understanding on possibilities and pros and cons of different technologies is needed.
What to inspect and where?
Online quality control can be applied in various phases of the glass process. What to inspect and where depend totally on the type of production, process, current quality level and the requirements set for the documentation and quality standards. Each case is different, but basic guidelines apply for most of them.
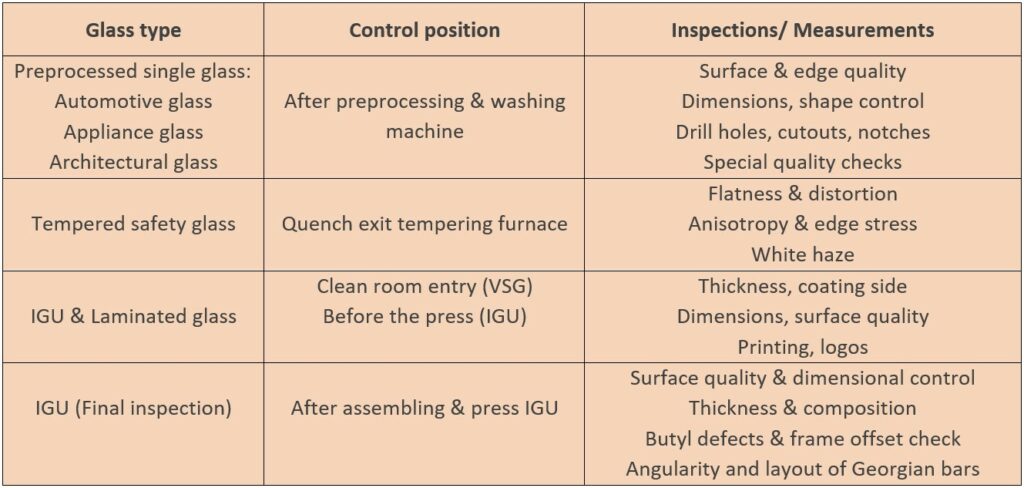
Final inspection is carried out to fulfill product standards, safety regulations, customer requirements and to provide necessary documentation. WIP is mostly inspected to decrease waste and increase efficiency. Defects should be detected as early as possible to remove the defective glass from the process and to avoid further waste. It also allows the operator to fix the process settings and order maintenance, when necessary.
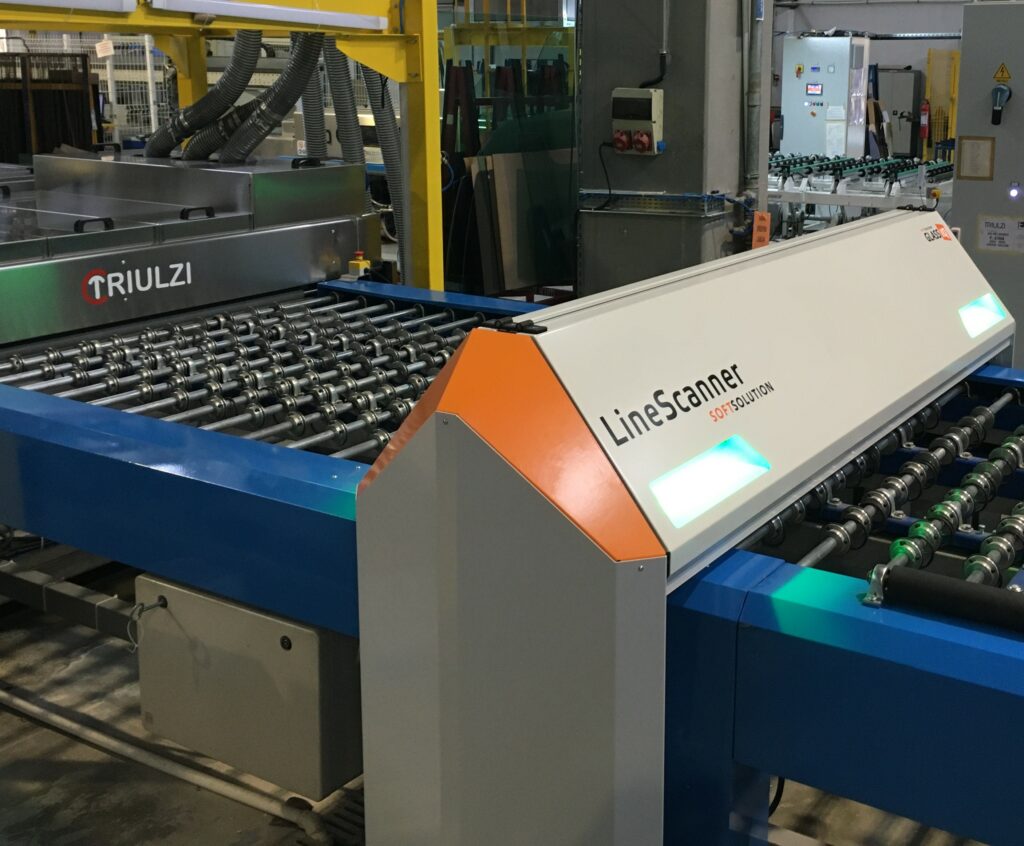
Automotive glass is typically inspected after preprocessing line to avoid costly further processing of defective pieces. Immediate feedback on rejects allows the operator to process replacement piece and take the corrective actions, check adjustments, replace worn out tools or order maintenance.
Here the glass is inspected for surface defects, edge quality and dimensions. Dimensional control may include outer and inner contours, size and position of drill holes and cutouts. Different quality profiles can be defined for A, B and C zones. A DXF file is needed for dimensional comparison.
Picture: LineScanner by Softsolution GmbH.
Camera and scanner based technologies
There are 2 basic technologies available for online scanning, and it is important to understand well the basic functions and differences to make the right choice for each application.
- Camera based systems using machine vision and algorithms perform well for inspection of similar defects that human eye sees, such as optics and distortions. They lack the precision needed for dimensional control and defects on the edge and surface but perform well for detecting optical distortions and measuring flatness of tempered glass, for instance.
- Linear telecentric scanning with parallel light is superior method to measure dimensions and detect minor defects, such as inclusions, dirt, fingerprints on the surface and edge chips and cracks. It is the only reliable method to discover minor edge chips and cracks in a reliable way.
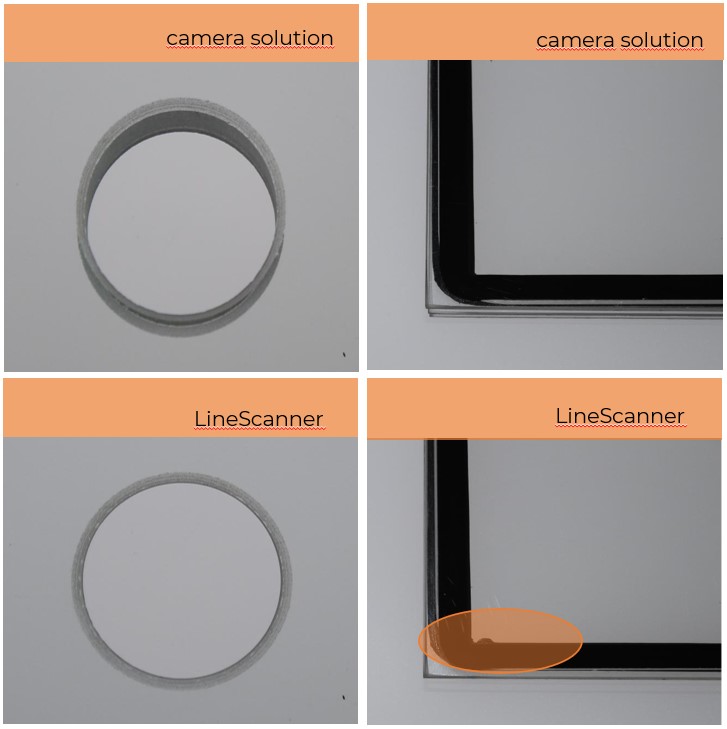
Due to the viewing angle, cracks and edge chips as well as near-edge butyl defects remain easily invisible for camera-based system. Poor edgework and cracks make the glass prone to breakage during tempering and bending process, which makes early detection important.
Based on parallel light, LineScanner scans the sample always at 90°. The scan is precise and especially suitable when dimensional control is important. In addition to surface and edge quality, LineScanner is able to measure dimensions, drill holes, cutouts, notches and verify shapes according to DXF of the piece.
Picture: Softsolution GmbH
Artificial intelligence & learning
Artificial intelligence plays a decisive role in interpreting an image produced by a camera or scanner and converting it to a tangible information, which can be categorized, assessed, and measured. To perform well, artificial intelligence needs high-quality, high-resolution data to give precise and reliable results through its algorithms.
For instance, online scanner used for surface inspection categorizes and values the surface and edge defects. The result is as good as the data given. A low-resolution picture or blurry image gives less information for AI algorithms compromising the precision and reliability of the inspection.
Sometimes the operator judges the software decisions differently. To improve the performance, the software should adopt this change and takes it into account in future evaluations. For instance, the LineScanner learns from the operator feedback and continuously adapts its categorization behavior improving the evaluation and reducing false rejects.
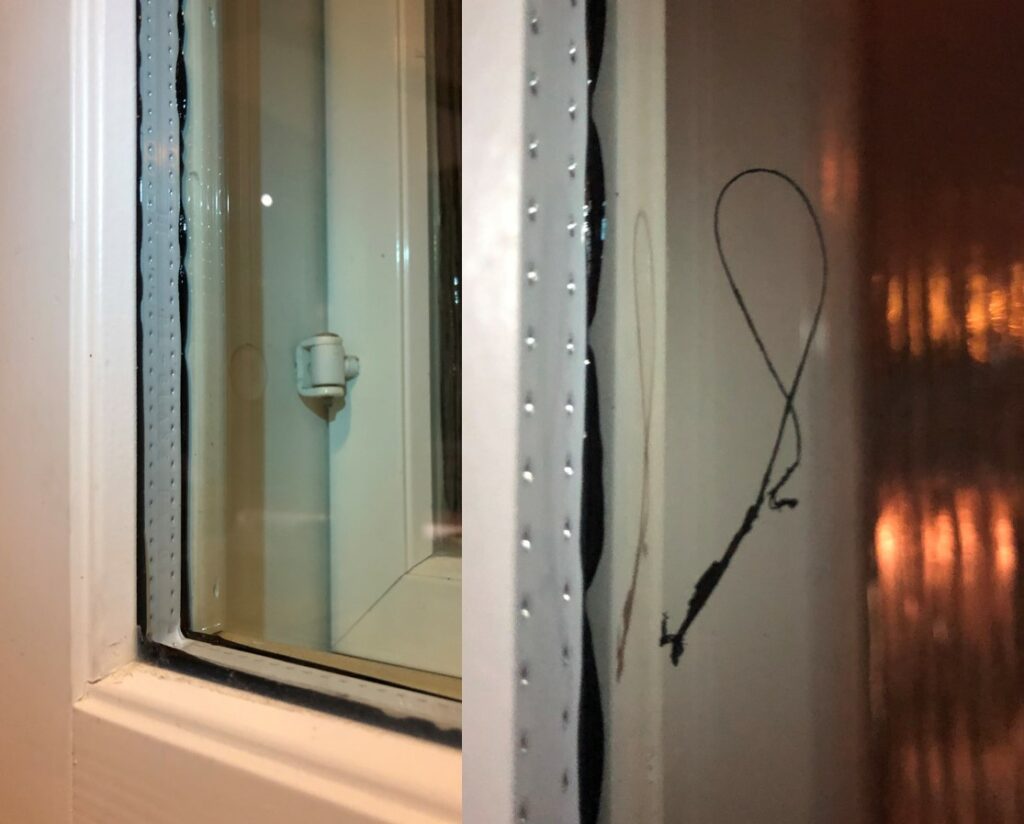
Visual inspections may be carried out both in IGU line and window factory, but those covers only part of the production and give unreliable results, as seen here.
Typical example of butyl extrusion defects, which should not end up in a customer’s windows; spattered cord inside and uneven sealant partly burst on the light space. This kind of defects would never pass online final inspection. If not claimed on time, annoying sight for years to come.
8 or 16-bit technology
The new innovative 16-bit technology provides far better performance than older 8-bit technology in terms of precision, discrimination of defects and reliability. The 16-bit technology enables the use of 65536 grey shades instead of 256 of 8-bit systems. This is especially important in production of dark glasses down to 15% of transparency.
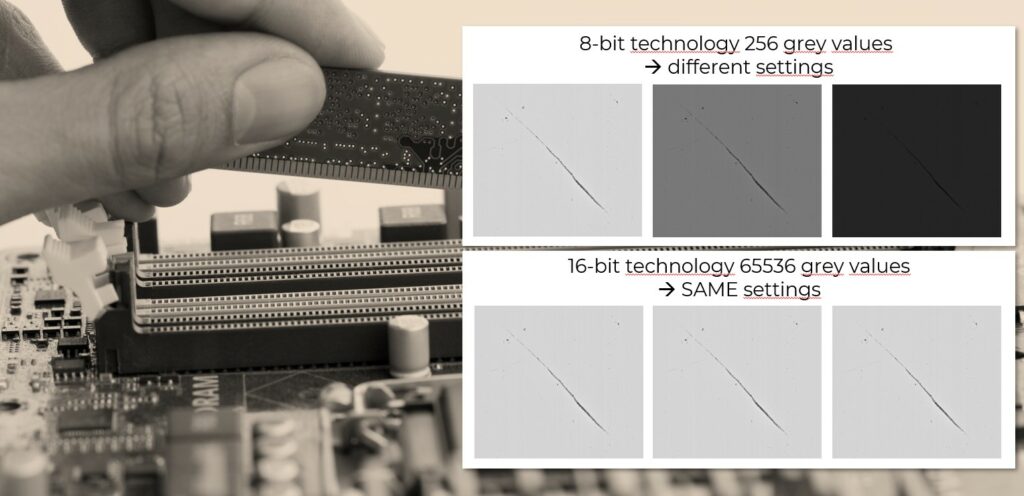
16-bit technology with 65536 grey values offers superior performance to others. Same sensitivity settings can be used for glasses of different level of transparence. The system is easier to install and use and less sensible for dust, which improves reliability and eases maintenance. Picture: LineScanner by Softsolution GmbH.
Sensitivity to defects and quality profiles
Most of the companies need to apply various quality profiles for different glass types, applications, and customers, or even zones of a single glass sheet. Flawless edge work is decisive when the edge remains exposed in the structure. A skilled tempering professional also knows that edge defects increase substantially the risk of breakage in the tempering process. Surface quality is more important in displays and showcases than handrails and partitions.
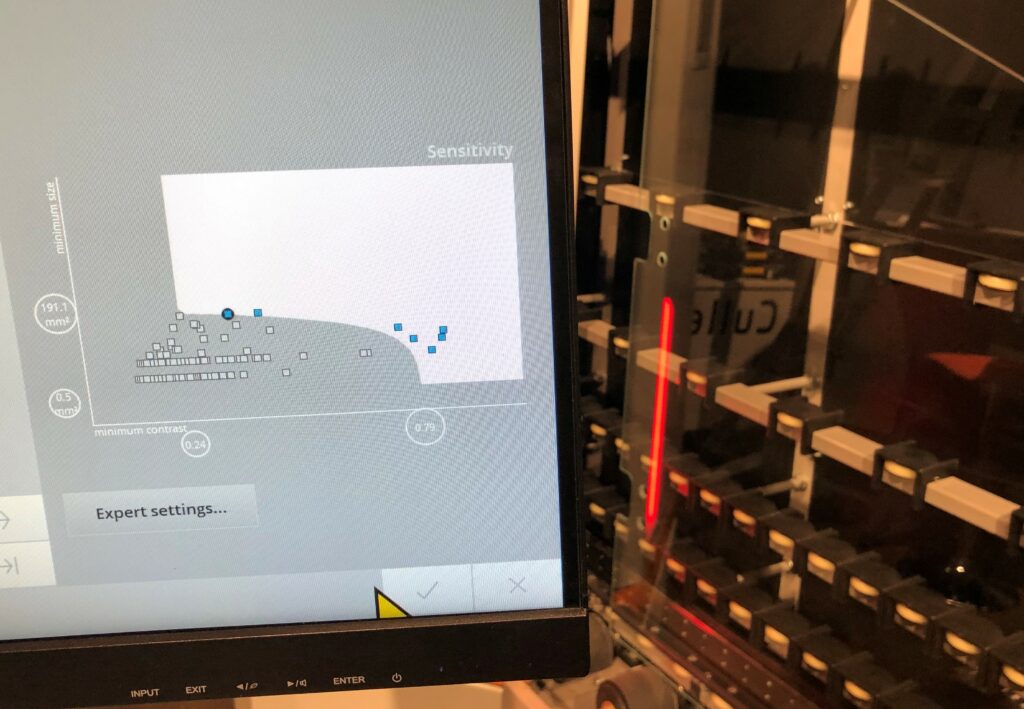
Easy and fast sensitivity adjustment is essential for proper process optimization. The operator can adjust the sensitivity of the system easily by comparing the measured defects indicated on the screen with the actual defects on the glass in real-time and adjust the thresholds for the size and contrast accordingly using 4 sliders.
Picture: LineScanner by Softsolution GmbH.
Footprint and versatility
Ease of installation and space is often ignored when considering scanner investment and this may lead to unforeseen costs. Factories seldom have extra space available for additional machines. A compact design pays off when the scanner must be fitted in a tight space, which is usually the case after preprocessing line. A scanner needs less space than camera-based system and is faster and easier to install especially in a vertical IGU line.
Sometimes most of the defects found in final inspection may indicate to system failures in earlier processes. Moving the inspection upstream can then be considered to improve the efficiency of the process. Originally installed for final inspection on an IG line, LineScanner can also be repositioned upstream before the press, or vice versa. This gives the glass company valuable flexibility to place the system where it is mostly needed.
Data management, statistics and documentation
A proper quality assurance system must have user friendly tools for data management, statistics, and documentation to serve various functions in the company: Production and quality management appreciates the possibility to export the data in MS Excel file or CSV format for further processing, analytics, graphics, and presentations. Traceability of the scans is important and should be easily available for each order. Final inspection provides certificates and documentation required by standards, safety regulations and customers. Whatever the system, make sure it complies with the ISO 9001 quality assurance standard requirements.
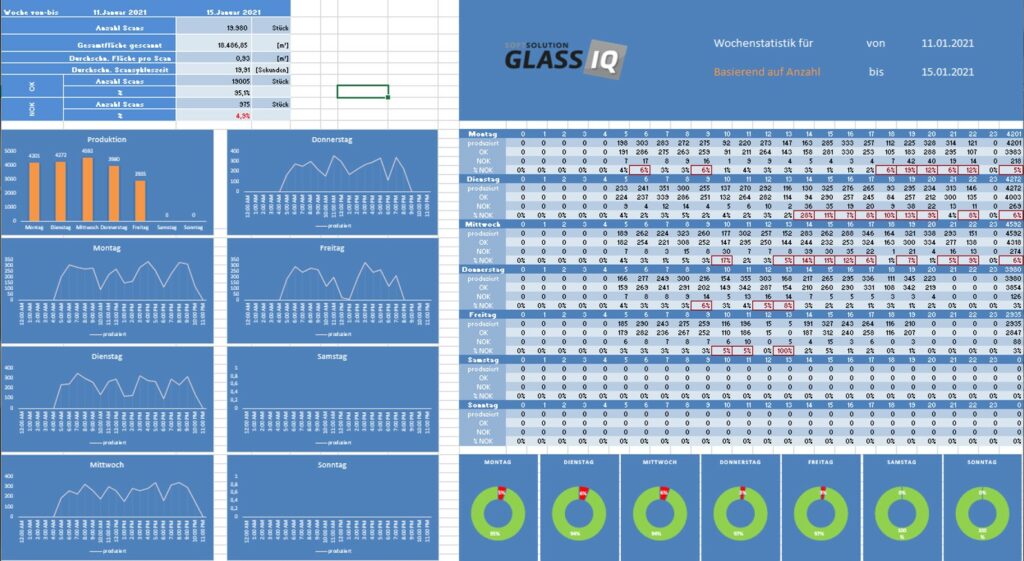
Operator interface comes with handy and flexible tools for statistics and data management. All the scans are presented in a table with adjustable views and possibilities for filtering, sorting, and searching. Traceability of the scans is easy with search function based on any information like barcode or order number and particular scanning image is just behind of a double click. Weekly reports are presented in illustrative graphics
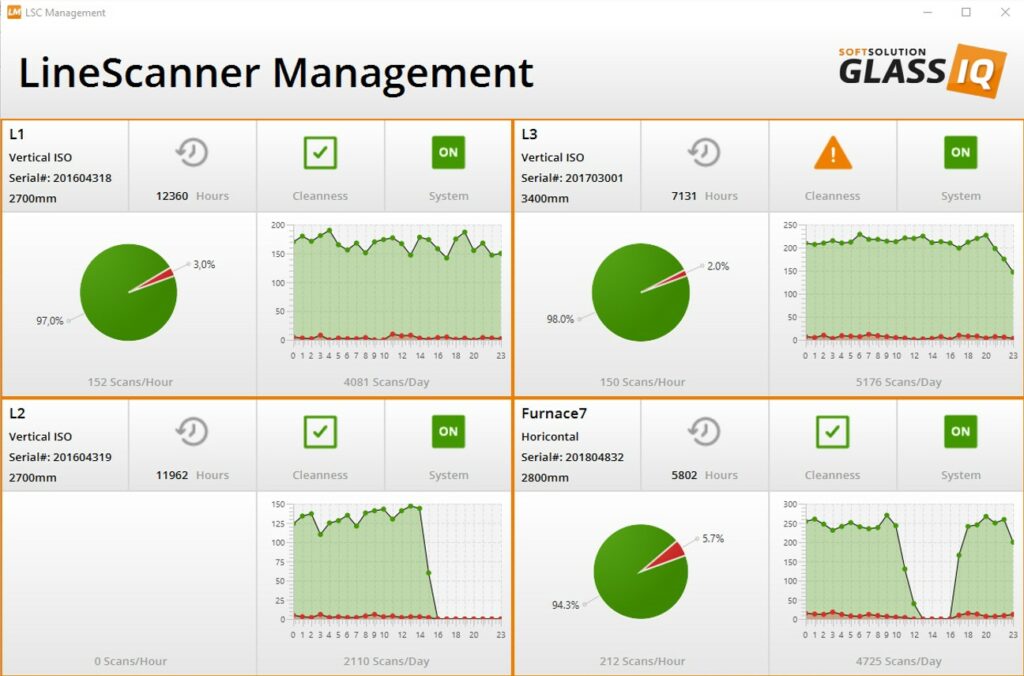
Multiple LineScanners in the production can be managed with Management Console, which provides the user with the most important data like status of the system, service requirements and current production figures with the corresponding quality results in real time.
Picture: Softsolution GmbH
Author: Juha Karisola © Akaan Trading Oy

